LivaChat Laravel LiveChat Application
Live chat
- New Chats
- My Opened Chats
- Solved Chats
- Operators Chat
- Chat Responses
- Live Chat Settings
- Livechat Appearance
- Livechat Integrations
- Live Chat Ratings
-
Introduction :
Elevate your customer service with our advanced LivaChat tool. It allows you to connect with your customers instantly, making conversations smoother and more impactful. Seamlessly integrated into your application, our LivaChat solution offers real-time communication, enabling instant assistance and personalized interactions. Whether addressing inquiries, resolving issues, or guiding users through your services, our LivaChat tool ensures that help is always within reach.
Experience the benefits of immediate response times, enhanced customer satisfaction, and streamlined service operations. With a user-friendly interface and robust functionality, our live chat application is designed to empower your team and delight your customers.
-
Description :
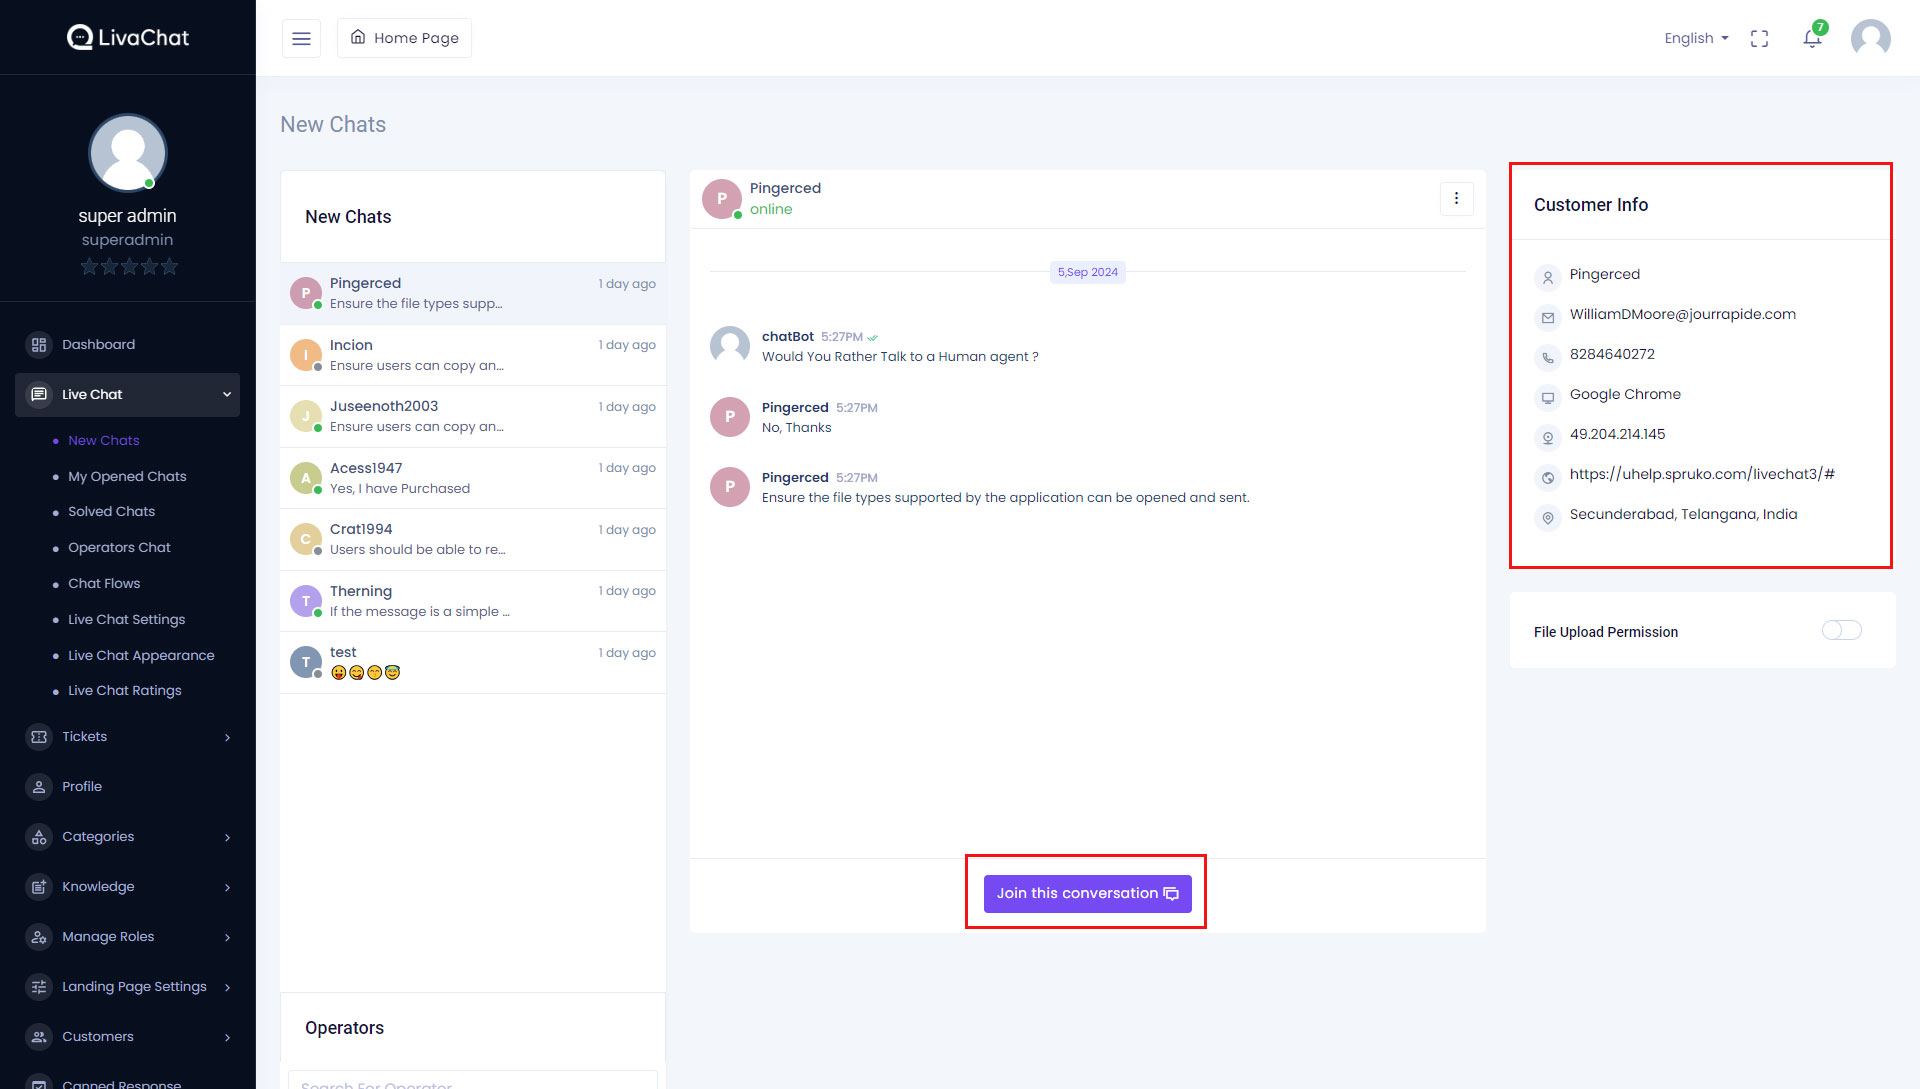
The "New Chats" page serves as a centralized hub for incoming customer inquiries. It presents operators with a list of new chats initiated by customers, providing immediate visibility into pending conversations. -
Operator Interaction :
Operators granted access to this section can seamlessly engage with customers by clicking on the "Join This Conversation" button. Upon clicking the "Join This Conversation" button, operators are swiftly connected to the respective chat, enabling prompt assistance. -
Customer Information Display :
Adjacent to each chat instance, pertinent details about the customer are prominently displayed, empowering operators with valuable context to deliver personalized assistance. Additionally, the "Customer Info" section provides comprehensive insights into customer profiles, facilitating informed interactions and tailored support solutions. -
Operator Collaboration :
Our Operator Collaboration feature provides a comprehensive view of all active operators within the application. By selecting an operator from the list, you can easily see their current activity and manage their assigned chats directly from this panel. This functionality ensures seamless coordination and efficient management of chat interactions, allowing operators to address and resolve customer inquiries effectively. - customer Info : This section provides comprehensive customer details, including name, email, mobile number, browser, IP address, geographic location (country), and the chat source (e.g., Live Chat, WhatsApp, Instagram) for precise and informed interactions.
Upon selecting an operator, you will be able to view a comprehensive list of chat interactions assigned to that specific employee and manage their chat assignments accordingly.
For enhanced management, each chat entry includes a menu accessed via a vertical ellipsis (three dots). This menu provides options to either reassign the chat to another operator or delete it, allowing you to tailor chat assignments according to your needs and criteria.
-
Description :
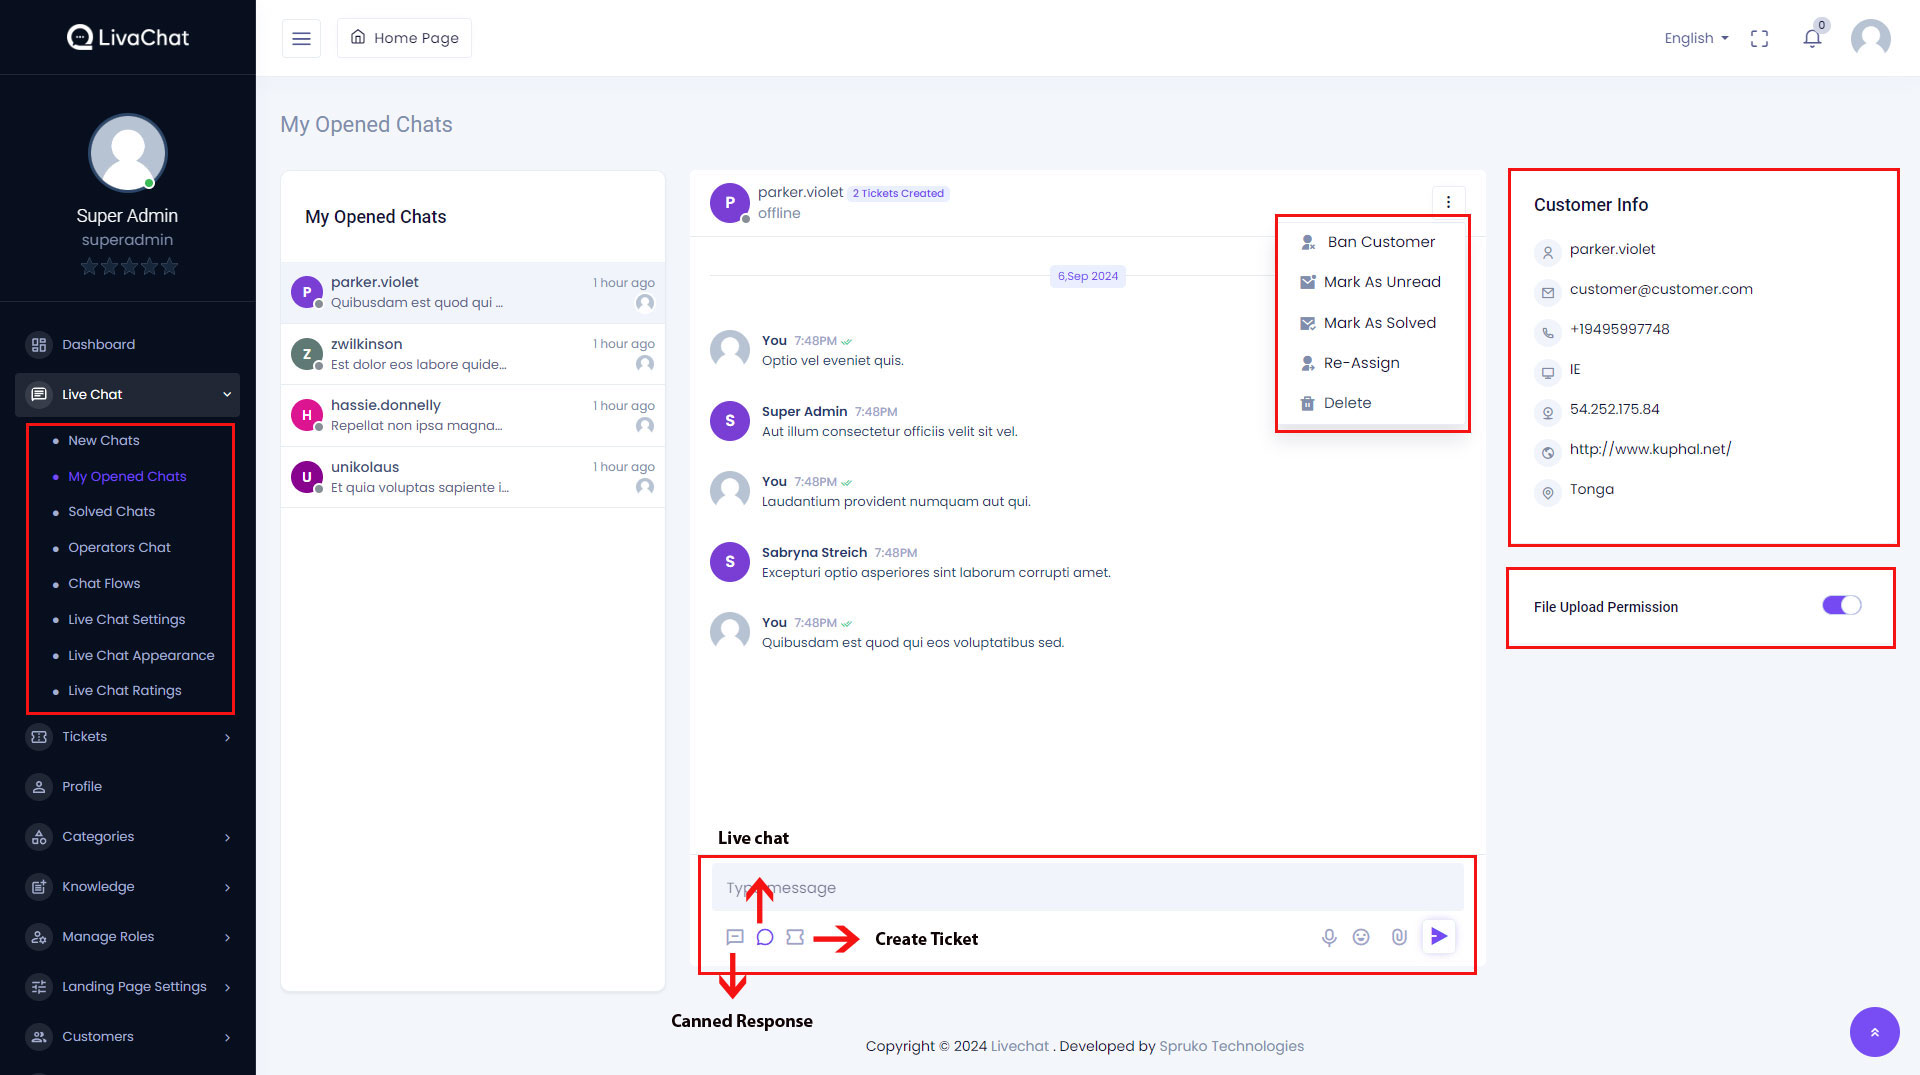
The "My Opened Chats" page provides operators with a comprehensive overview of chats in progress, specifically those they are currently engaged in. This page is accessible only to operators with the necessary permissions.
When a customer initiates a new chat, the conversation will appear in new chats. By clicking Join the Conversation, the chat will be seamlessly transferred to your active chat list (My opened chats), allowing you to engage with the customer promptly and efficiently. -
Chat Management :
Within the chat interface, operators are equipped with several tools to streamline communication and enhance efficiency. Notably, the availability of predefined responses through the "Canned Response" feature facilitates rapid replies, while the "Create Ticket" option enables operators to seamlessly escalate inquiries to the ticketing system for further handling.
Operators can perform various actions on individual chats by clicking on the three vertical dots (.) located within the chat header. These actions include marking chats asBan Customer , unread, marking them as solved, re-assigning chats to other operators, or deleting them as needed.
-
Customer Information :
Alongside each chat, relevant customer information is displayed, enabling operators to gain insights into the customer's profile and history. Additionally, operators have the option to grant file upload permission to customers individually.When the file upload permission toggle switch is enabled, any files attached by the customer will be displayed directly within the chat. If the toggle switch is disabled, the customer will receive an email notification regarding the file attachment, ensuring they are informed about the file's presence and can take appropriate action. -
Workflow Optimization :
By leveraging the functionality of this page, operators can efficiently manage ongoing chat interactions, ensuring timely responses and effective resolution of customer inquiries. The ability to mark chats as unread or solved, as well as re-assigning or deleting them, enhances workflow optimization and productivity within application.
-
Description :
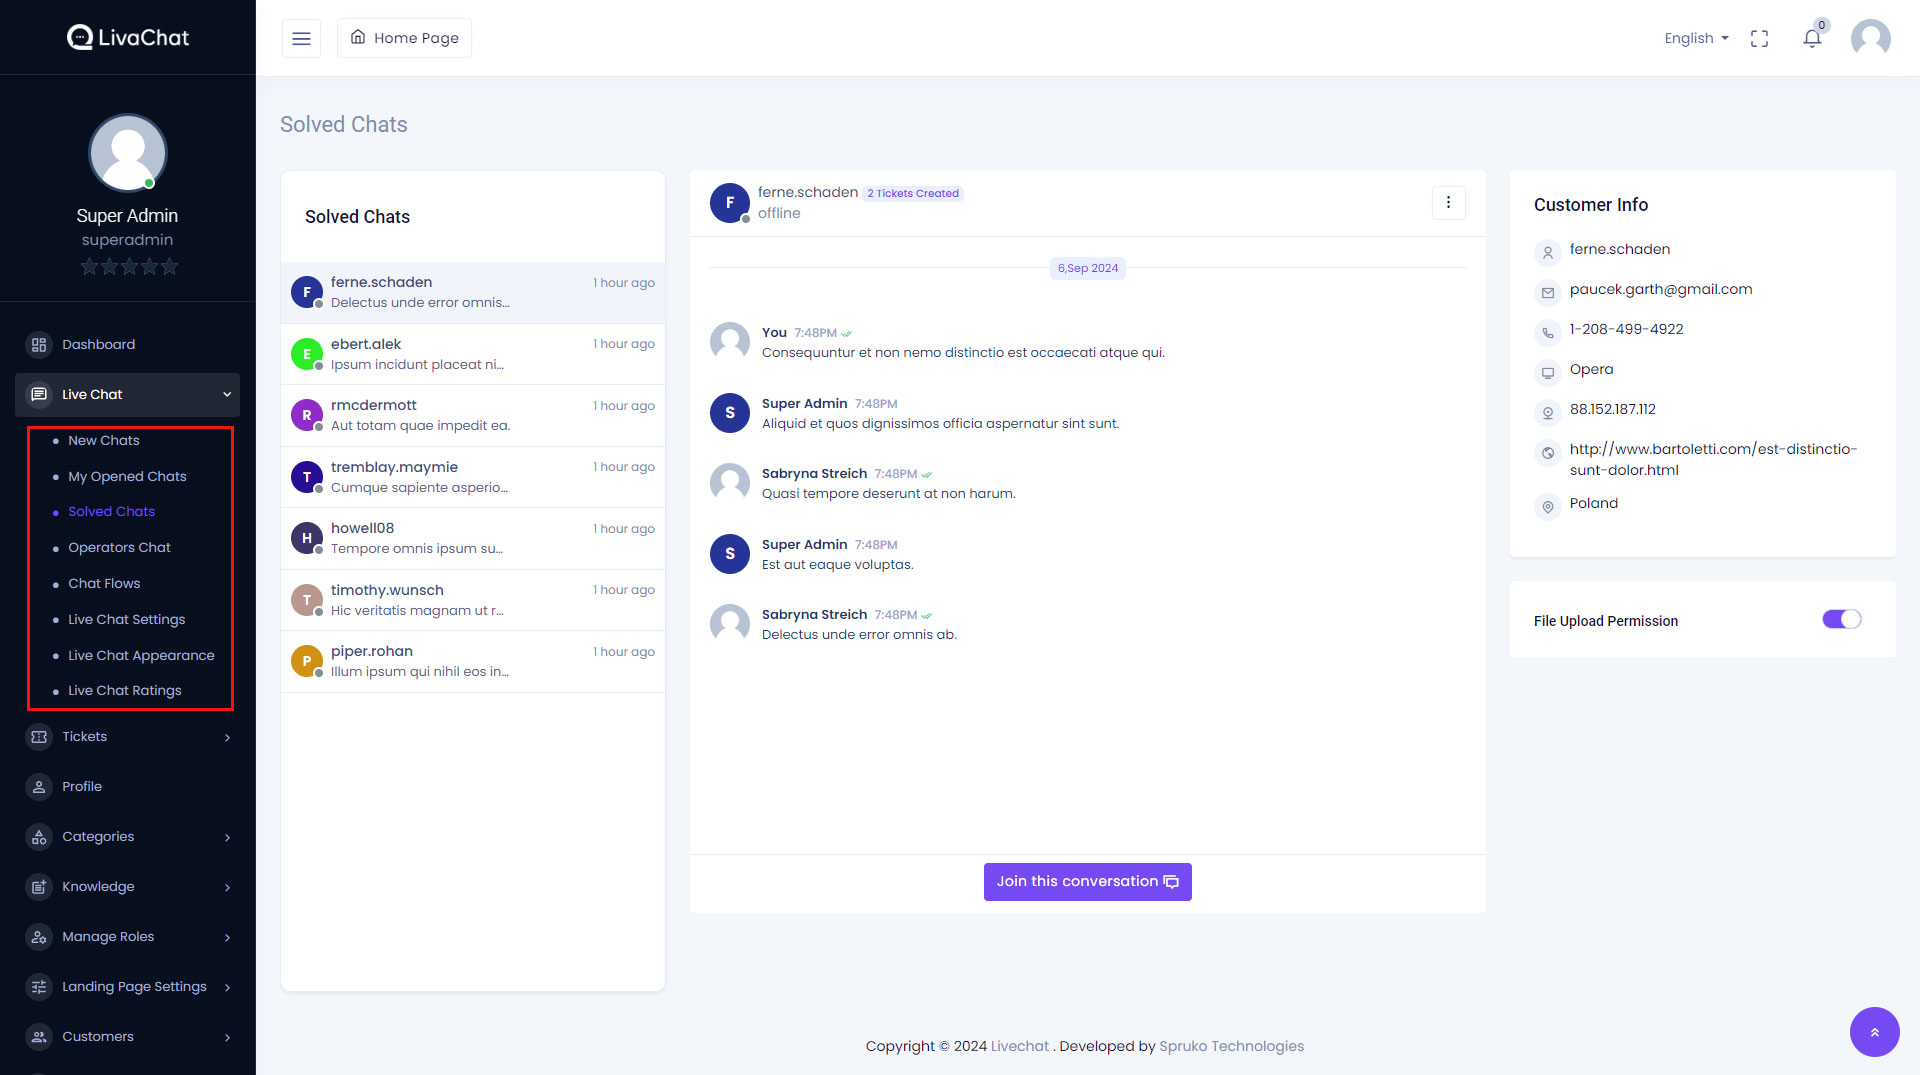
The "Solved Chats" page serves as a repository for conversations that have been successfully resolved by individual operators. This section offers valuable insights into past interactions and outcomes, facilitating comprehensive record-keeping and performance analysis within the application. -
Resolved Conversations :
Solved chats are archived within this section, providing operators with a comprehensive overview of past interactions that have been successfully concluded. The availability of historical chat data enables operators to review past resolutions, track customer inquiries, and identify trends or recurring issues for further analysis. -
Performance Evaluation :
Operators and administrators can utilize the Solved Chats section to assess individual and team performance metrics. By reviewing past interactions and resolutions, stakeholders can identify areas of strength and opportunities for improvement, ultimately enhancing overall service quality and customer satisfaction.
-
Description :
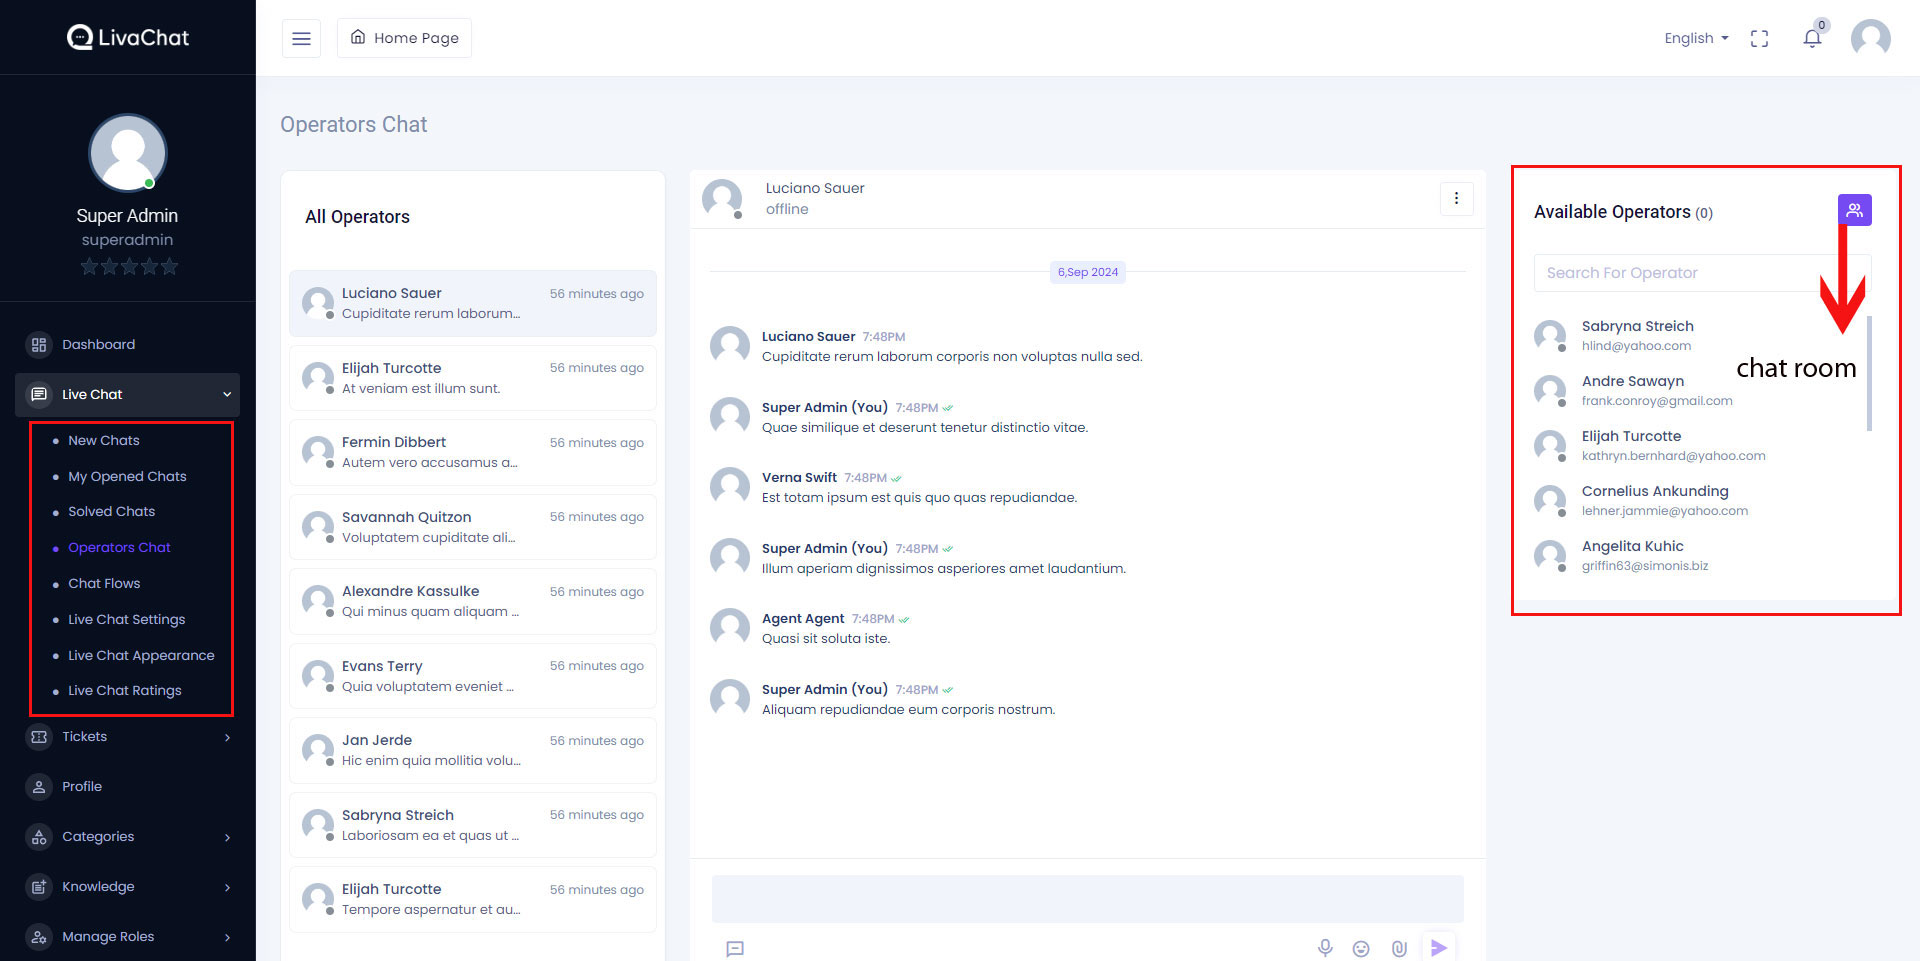
The "Operators Chat" page provides a platform for operators to engage in internal communications and collaborative discussions within the application. Here's a deeper dive into its functionality -
Conversation Hub for Operators :
The "Operators Chat" page serves as a centralized hub where operators can engage in conversations among themselves, fostering teamwork and collaboration. Operators granted access to this section can view and participate in discussions with their colleagues, facilitating real-time communication and knowledge sharing. -
Available Operators Selection :
Within the "Operators Chat" page, a section titled "Available Operators" is located on the right side. Logged-in operators can utilize this section to select available colleagues with whom they wish to initiate a chat. By choosing from the list of available operators, operators can seamlessly connect and engage in one-on-one or group discussions, enhancing communication and coordination within the team. -
Creation of Chat Rooms :
- The "Operators" section also features a "Chat Room" button within the "Available Operators" section.
- Clicking on this button initiates the creation of a chat room, enabling operators to engage in group conversations with selected colleagues.
- Upon clicking "Create Room," a chat room is established, and all operators selected for the conversation are included, irrespective of their availability status.
- Operators with permission to access the "Operators" page can leverage this feature to facilitate group discussions, brainstorming sessions, or collaborative problem-solving efforts, fostering teamwork and synergy within the application.
-
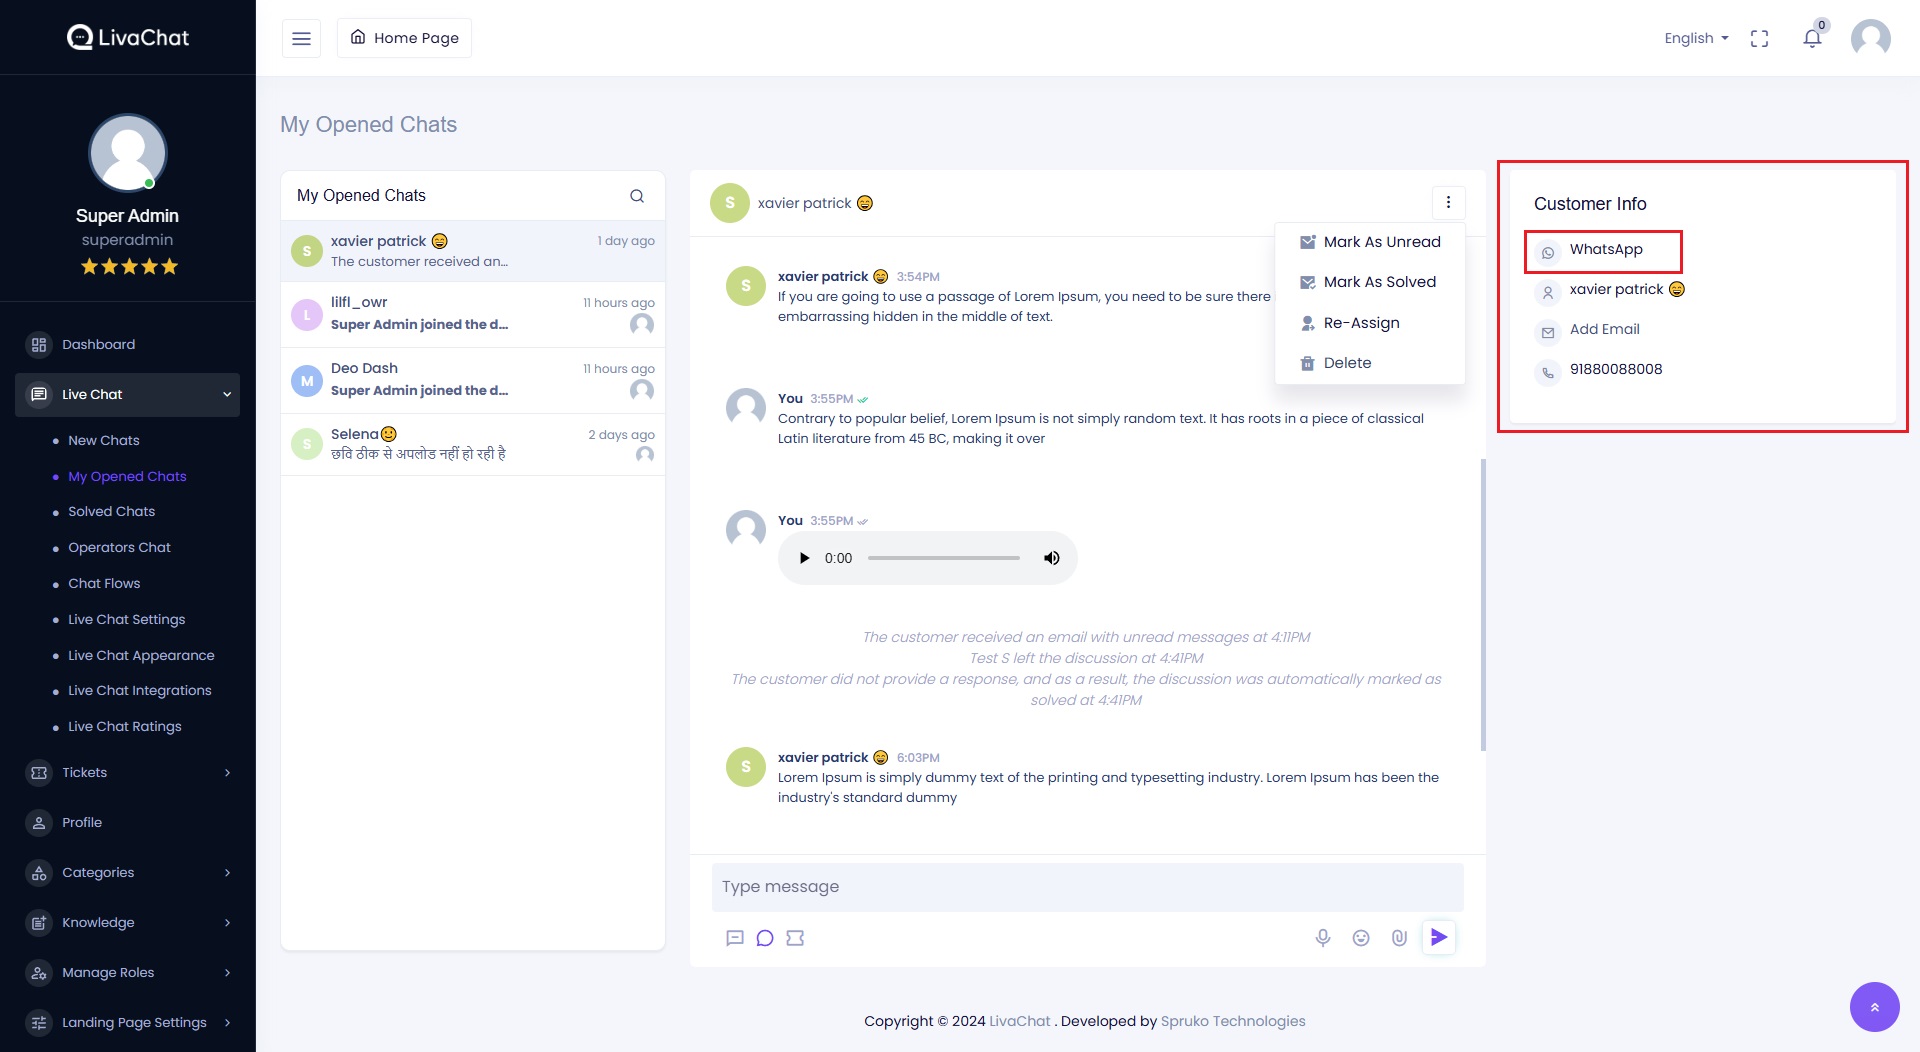
Voice Messaging, Text-To-Speech And Message Translations :
-
Text-to-Speech Integration :
You can now listen to the text messages sent by customers in your preferred language.
This feature allows you to convert written text into voice for better accessibility and convenience. -
Message Translation :
Easily translate specific messages into the language of your choice.
Overcome language barriers and improve the overall customer support experience. -
Voice Messaging :
Send voice messages seamlessly in all chat types.
This feature enables quicker communication, especially for complex queries or instructions.

-
Text-to-Speech Integration :
-
Introduction :
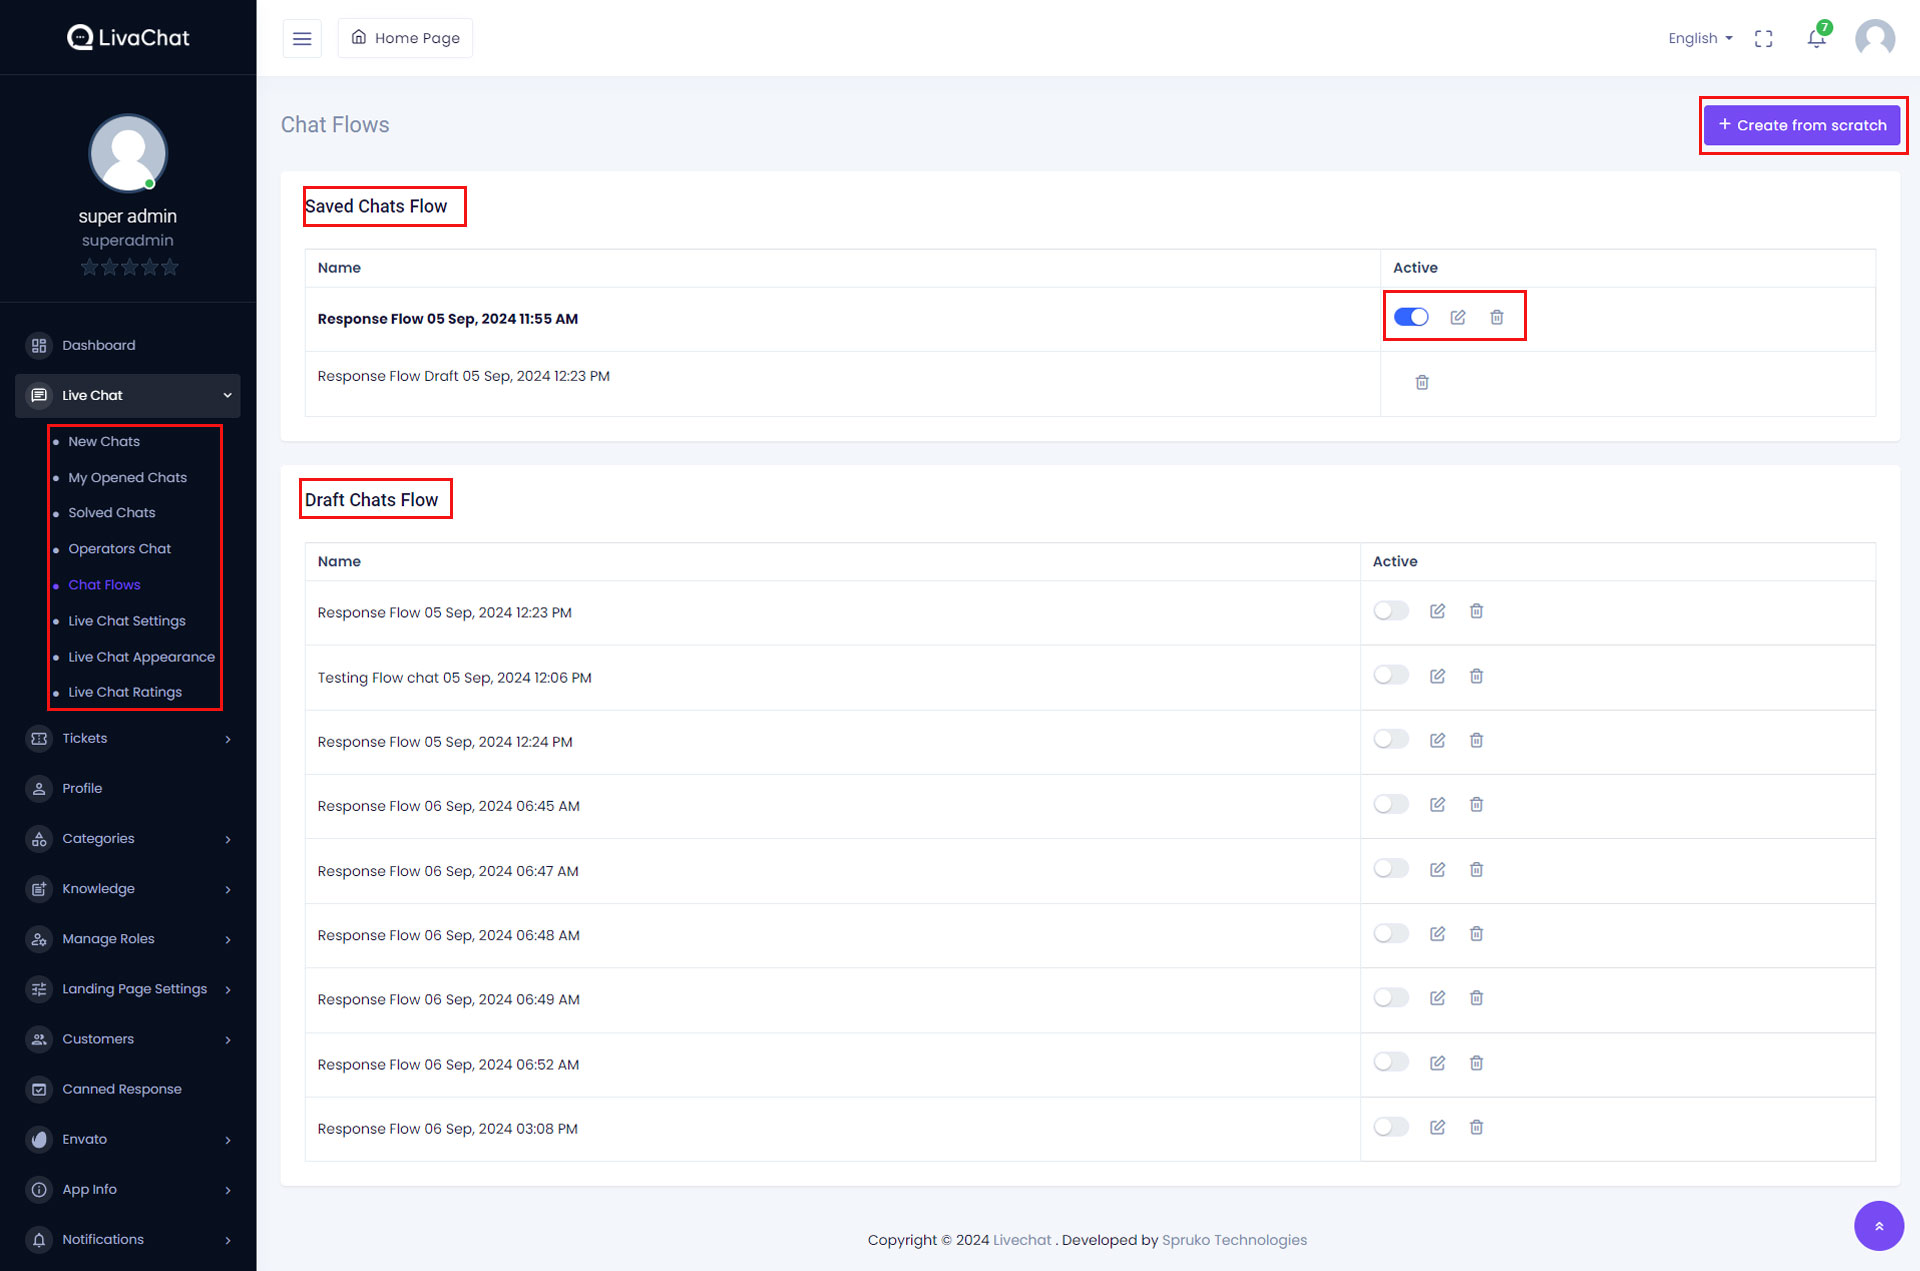
The "Chat Flows" feature enables users to design and manage interactive chat experiences within the application. Users can create custom chat flows tailored to specific scenarios, guiding customers through predefined conversational paths. -
Creating a New Chat Flow :
Users can initiate the creation of a new chat flow by clicking the "Create from scratch" button. This action redirects users to the "Response Flow" page, where they can commence building their chat flow from scratch. -
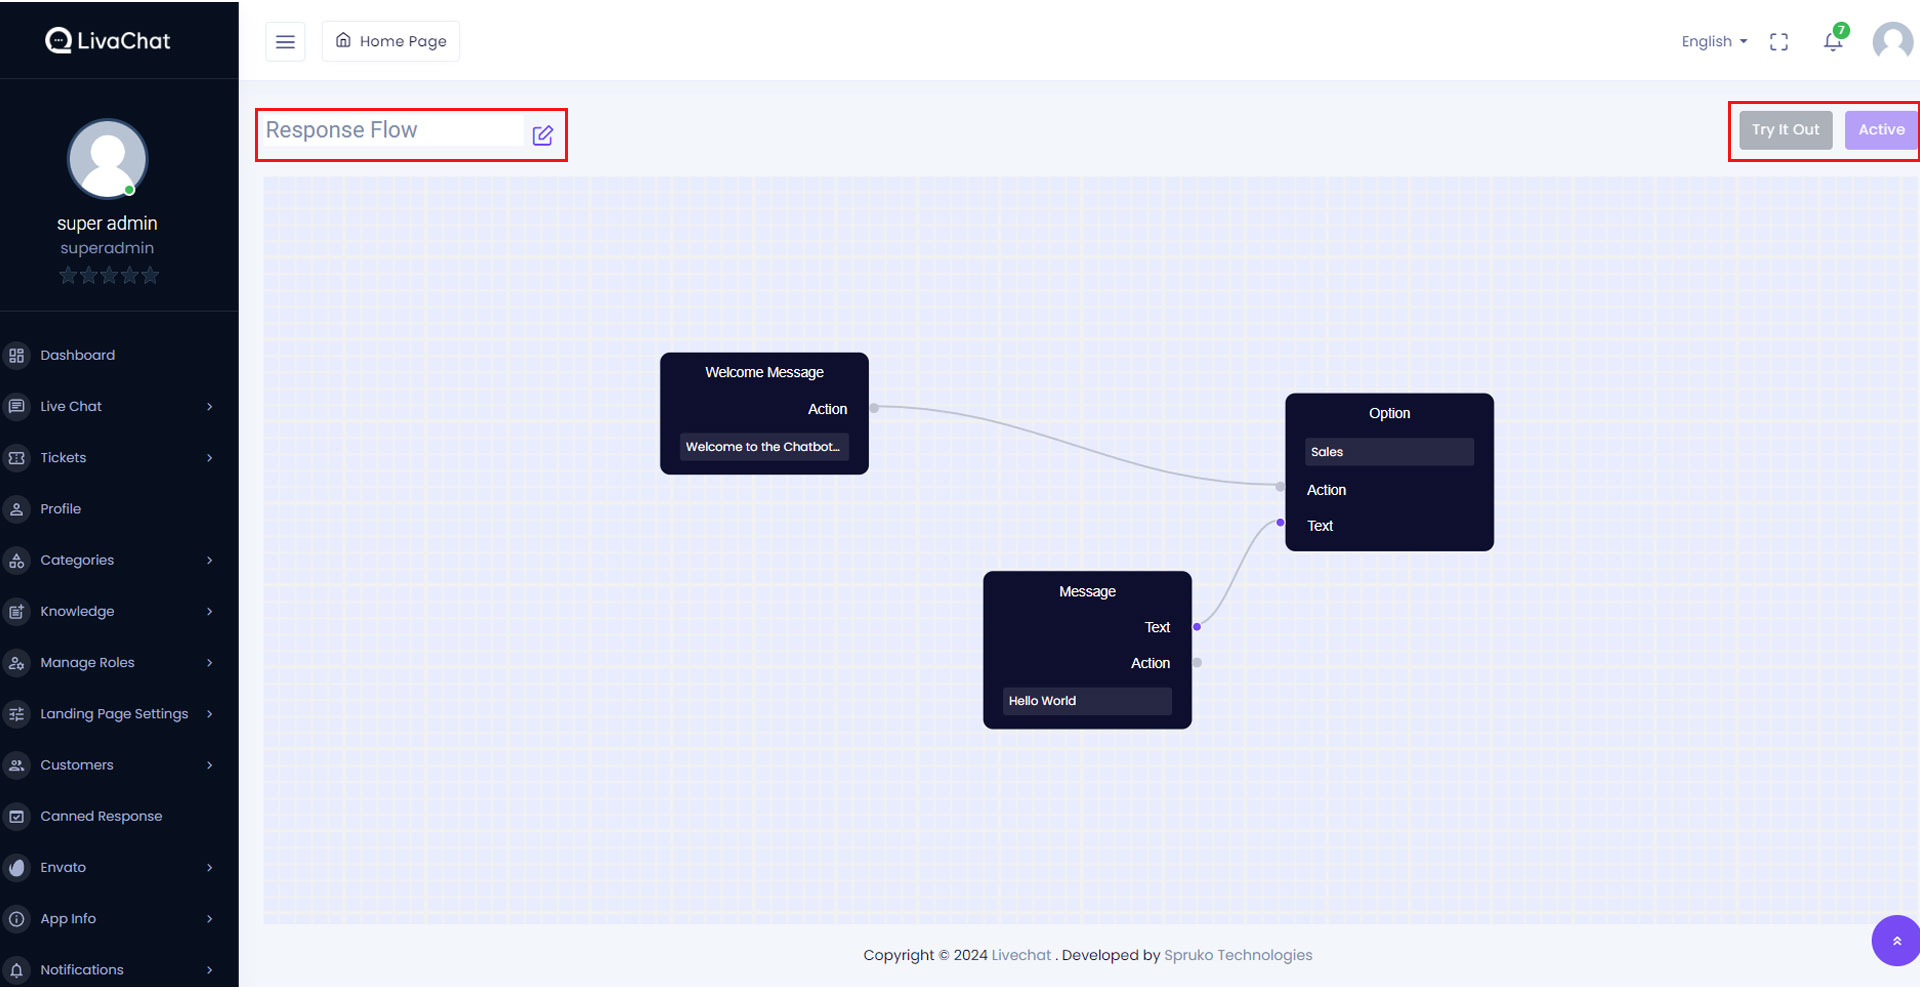
Understanding Chat Flow Components:
- Each chat flow comprises three essential components:
-
Welcome Message :
This initial message serves as the entry point for customers engaging in the chat. Users cannot delete the welcome message but can edit its content. -
Message :
Messages serve as inputs within the chat flow, providing responses or prompts to customers based on their interactions. -
Option :
Options represent the potential outputs of the chat flow, guiding customers to subsequent messages or actions based on their selections.
-
Editing and Connecting Nodes :
Users can edit, delete, or create new messages and options by right-clicking the mouse and selecting the appropriate action from the menu. It's essential to maintain the flow's logical progression by connecting message inputs to option outputs. While connections between different types of nodes are allowed, connections between identical nodes (e.g., message to message) are prohibited. -
Node Types :
Within the chat flow, users encounter two node types: "Text" and "Action." "Text" nodes facilitate the delivery of textual responses to customers, while "Action" nodes execute predefined actions within the chat flow. -
Testing and Activation :
To evaluate the chat flow's functionality, users can simulate customer interactions by clicking the "Try it Out" button. Once satisfied with the flow's performance, users can activate it for customer-facing display by clicking the "Active" button. -
Auto-save Functionality :
The chat flow system incorporates auto-save functionality, ensuring that any modifications or additions made to existing or new flows are promptly saved. Drafts of chat flows are automatically saved separately, providing users with a safety net for iterative refinement and experimentation. -
Example Scenario :
Consider a scenario where a customer engages in a chat to order coffee. Upon initiating the chat, a bot response welcomes the customer and presents three options: "Cappuccinos," "Espresso Shots," and "Flat Whites." Depending on the customer's selection, the chat flow progresses accordingly, guiding the customer through the ordering process with additional options and responses.
- The "Live-chat Setting" page within the application serves as a centralized hub for configuring various settings related to live chat functionality. Let's delve into each setting available on this page :
- SSL Data
- LiveChat
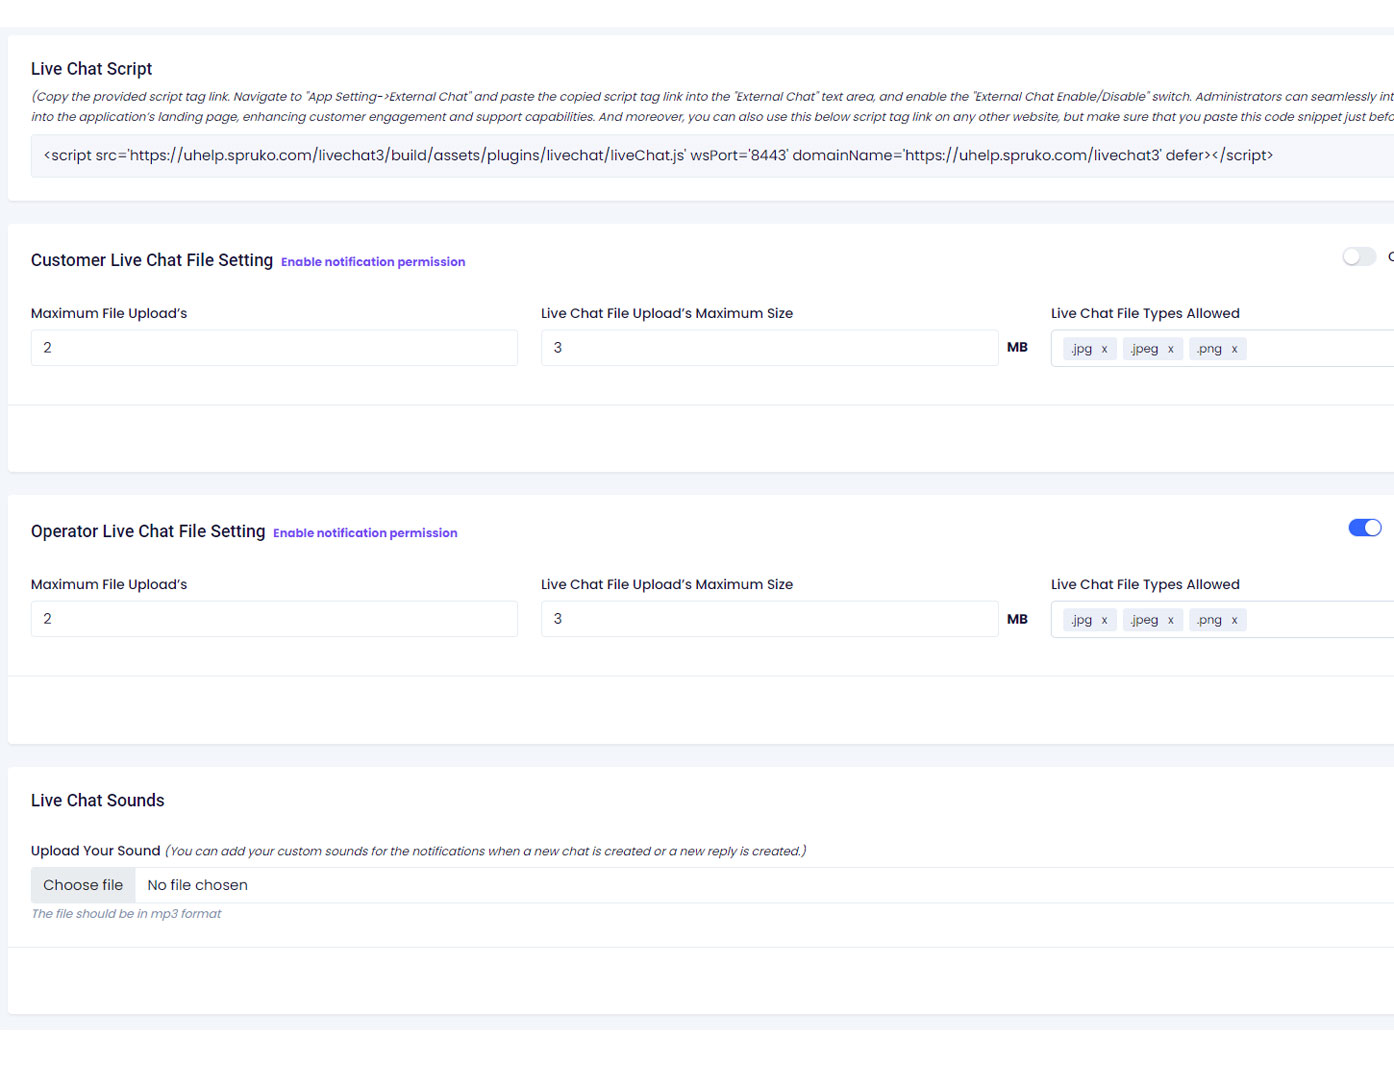
- Live Chat Script
- Customer/Operator Live Chat File Setting
- Live Chat Sounds
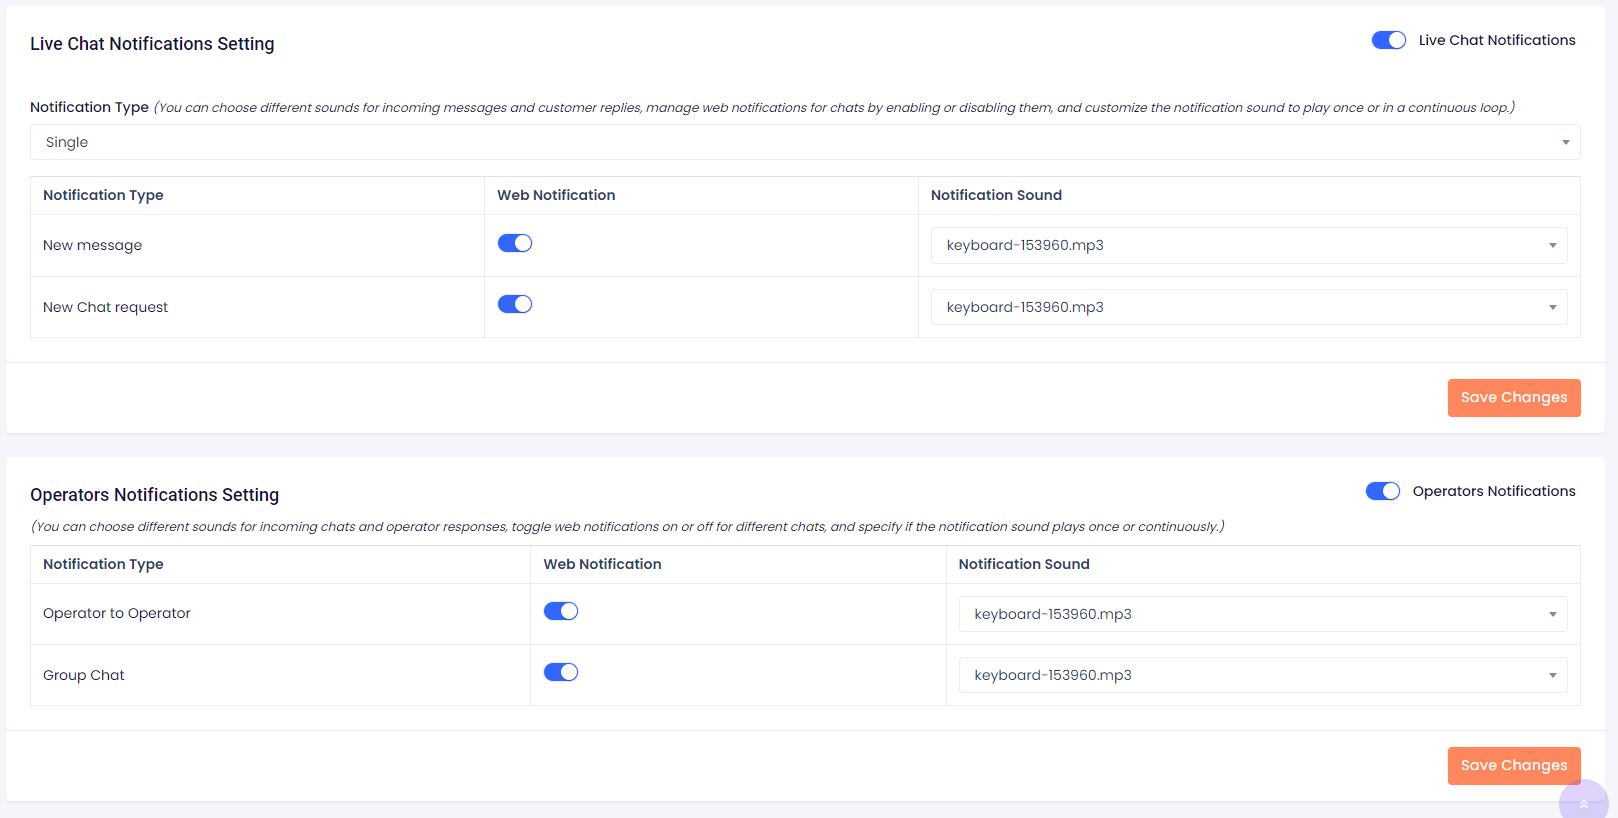
- Live Chat Notifications Setting
- Operators Notifications Setting
- Live Chat Flow Setting
- Live Chat Offline/Online Setting
- Chat Auto Solve
- Auto Delete Livechat
- Feedback Dropdown
- This setting facilitates the connection between the application and your server through the utilization of SSL (Secure Sockets Layer) certificates. To configure SSL data :
- Obtain the SSL Certificate and SSL Key from your server or domain where the application is hosted.
- Copy and paste the SSL Certificate and SSL Key data into the designated text areas on the "Live-chat Setting" page.
- Ensure that a valid SSL certificate is installed on your server to establish a secure connection.
- After entering the SSL data, click on the "Save Changes" button to apply the configuration.
- Upon successful connection establishment, the "SSL Data" section transitions into a disabled mode, indicating that the SSL settings are configured and connected to your server.
- Subsequently, the "LiveChat" section below becomes enabled for further configuration.

The "Live-chat Setting" page empowers users to configure essential settings related to LivaChat functionality, ensuring seamless communication and interaction with customers. By providing detailed instructions for configuring SSL data, the documentation aims to facilitate a smooth setup process, thereby enabling users to leverage live chat capabilities effectively.
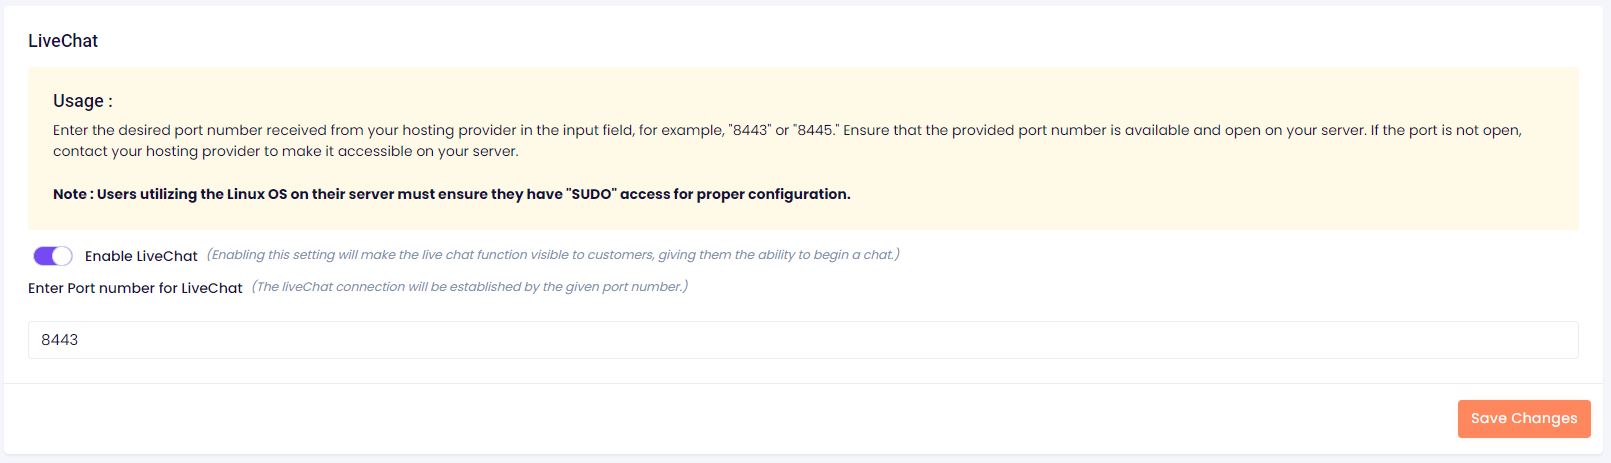
- In this LiveChat section, we have to setup two settings. "Enable LiveChat" and "Enter Port number for LiveChat"
-
Enable LiveChat :
- Description: This setting features a toggle switch labeled "Enable LiveChat". Enabling this switch makes the live chat function accessible to customers, allowing them to initiate chat sessions with service operators.
- Usage : Toggle the switch to the "ON" position to activate the live chat feature.
-
Enter Port number for LiveChat:
- Description: In this setting, there's an input field labeled "Enter Port number for LiveChat". Admins can specify a port number to establish the LiveChat connection.
- Usage : Enter the desired port number in the input field, for example, "8443" or "8445". Ensure that the provided port number is available and open on your server. If the port is not open, contact your hosting provider to make it accessible on your server.
- Note : Users utilizing the Linux OS on their server must ensure they have "SUDO" access for proper configuration.
-
These settings collectively enable seamless integration and functionality of the LivaChat feature, enhancing customer service interactions and satisfaction.
These settings empower admin panel users to configure and manage the LiveChat functionality efficiently, thereby bolstering customer service capabilities and fostering improved communication with customers.
3. Live Chat Script :-
Script Tag Link Example :
-
An automated script tag link will be generated, followed by your domain where the application is installed, for instance:
<script src='https://example.com/uhelp/build/assets/plugins/livechat/liveChat.js' wsPort='8443' domainName='https://example.com/uhelp' defer></script>. This link is crucial for integrating the chat icon into the application's interface/landing page.
-
An automated script tag link will be generated, followed by your domain where the application is installed, for instance:
-
By following these steps, administrators can seamlessly integrate the chat icon into the application's landing page or on the desired website, enhancing customer engagement and support capabilities.

By leveraging these settings, admin panel users can ensure the live chat feature is fully functional, secure, and optimized for customer engagement.
4. How to setup live chat global settings?-
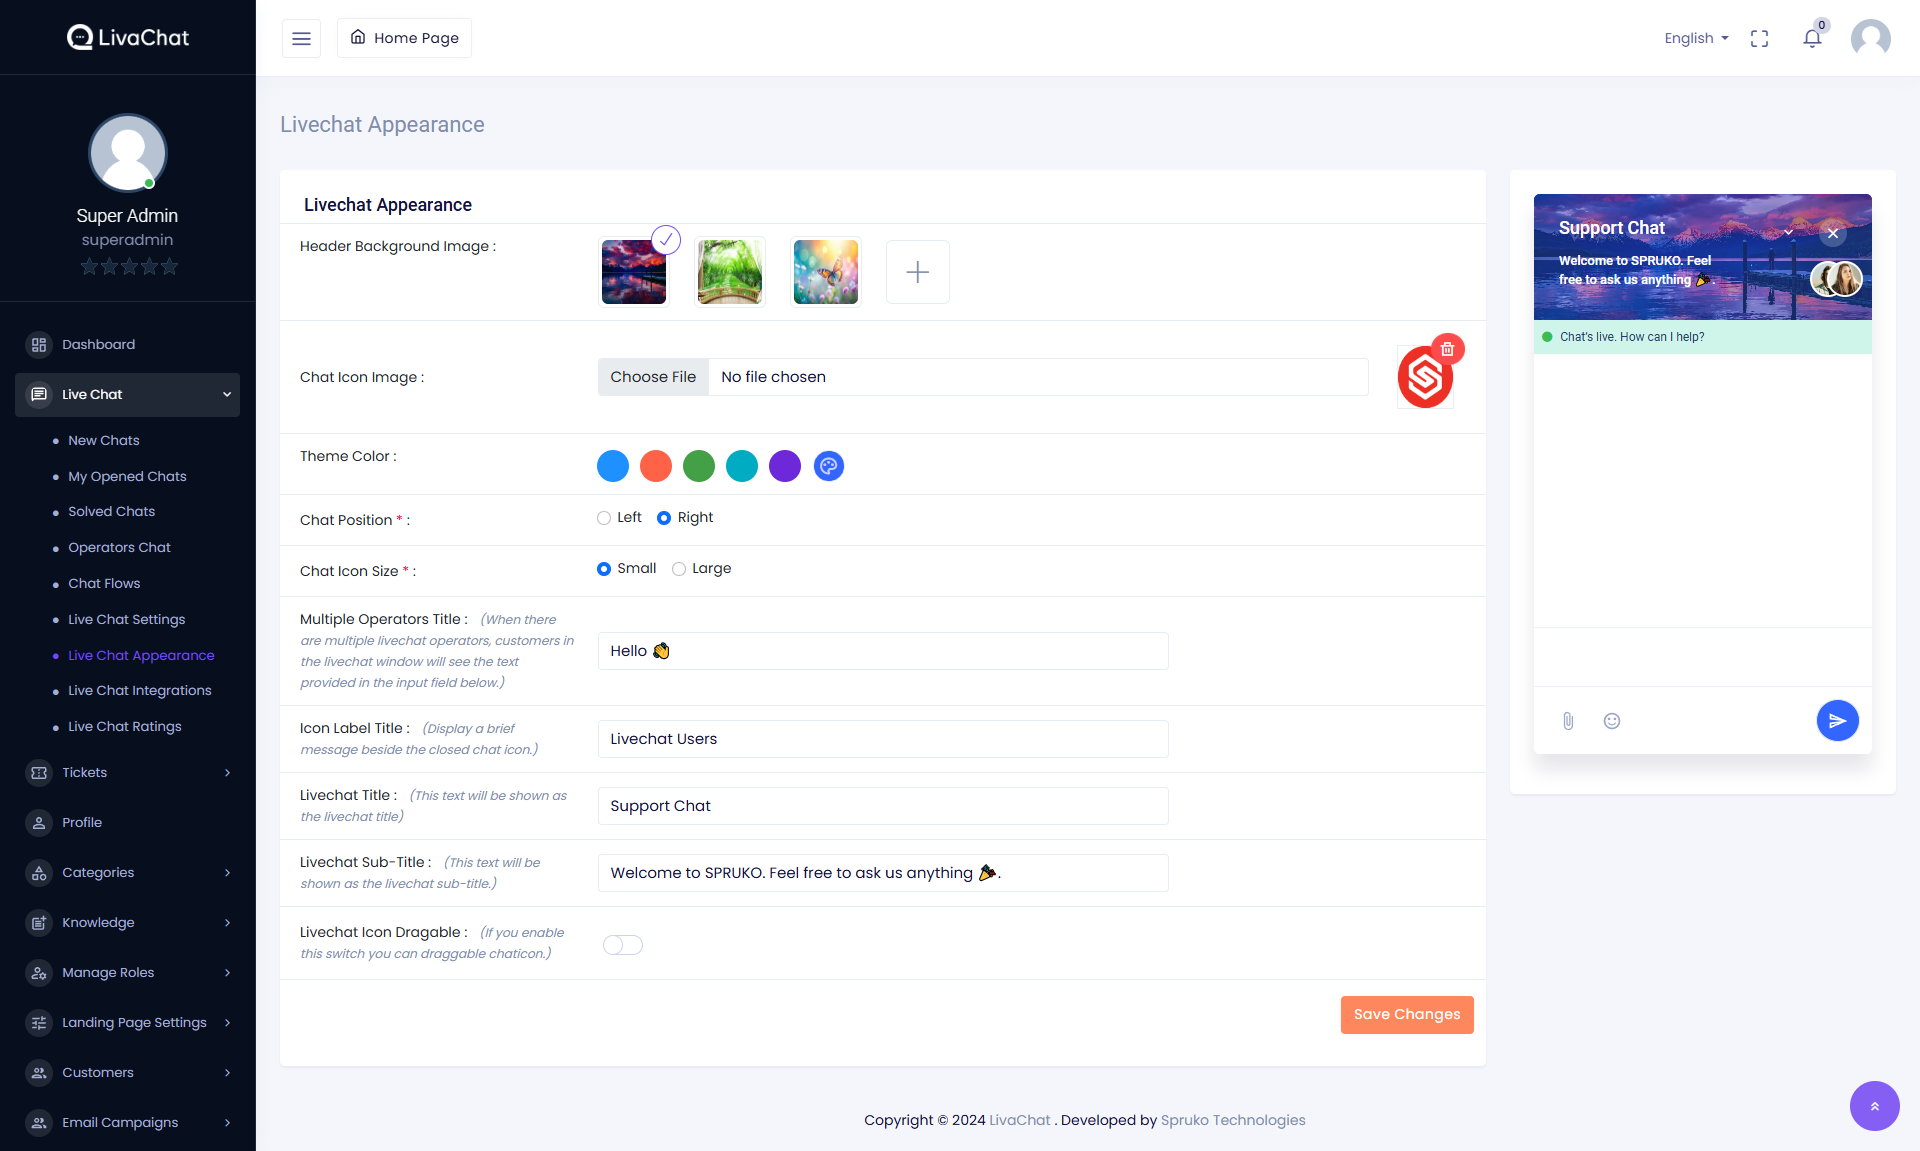
Live Chat Settings :
Each concept on the "Live Chat Settings" page is thoroughly explained, as shown in the image provided below with short text.

- The configuration of the live chat feature encompasses the following elements
- Header Background Image You can choose or add an image for the header livechat window
- Chat Icon Image You can add an image for the livechat popup button.
- Live Chat Icon Color The color of the live chat icon, which can be customized to align with branding or user preferences.
- Icon Placement : The placement of the live chat icon on the screen, allowing for optimal visibility and user accessibility.
- Icon Dimensions : The dimensions of the live chat icon, which can be adjusted to suit design and usability requirements.
- Icon Text : The text associated with the icon, providing users with a clear indication of its function.
- Chat Window Main Title : The main title displayed at the top of the chat window, offering users context or an introduction to the chat session.
- Additional Text : Additional text below the chat title, which can provide supplementary information or guidance to users
- Livechat Icon Dragable : If enabled, customers can place the livechat icon where ever they want on the website.
-
WhatsApp Business Messaging Integration
This integration represents the latest and most advanced feature of the application, enabling seamless communication between customers and admins. With WhatsApp Business Messaging:
-
-
Customers can initiate chats directly from their WhatsApp, providing a familiar and convenient channel for interaction.
-
Admins can manage all customer messages in one unified platform, ensuring efficient handling of queries and support requests.
-
The integration supports real-time messaging, allowing for instant responses and improved customer satisfaction.
-
Key features include automated notifications, message templates, and the ability to manage multiple customer conversations simultaneously.
-
-
This feature bridges the gap between customers and businesses, streamlining communication and enhancing the overall support experience.
-
To integrate WhatsApp into your LiveChat platform, follow these steps to set up the WhatsApp Business Platform and obtain the necessary credentials :
-
-
Create a Facebook Business Manager Account
-
Visit the Facebook Business Manager and sign in with your Facebook account.
-
Click on "Create Account" and provide your business details to set up your Business Manager account.
-
-
Verify Your Business
-
In the Business Manager, navigate to "Business Settings".
-
Under "Security Center", initiate the business verification process by submitting the required documents.
-
-
Create a WhatsApp Business Account
-
Within Business Settings, go to "Accounts" > "WhatsApp Accounts".
-
Click on "Add" and follow the prompts to create your WhatsApp Business Account (WABA).
-
-
Add a Phone Number
-
In your WABA, navigate to "Phone Numbers".
-
Click "Add Phone Number", enter the number you wish to use, and complete the verification process via SMS or voice call.
-
-
Obtain Necessary Credentials
-
WhatsApp Phone Number ID : In your WABA, select your phone number to view its unique ID.
-
WhatsApp Business Account ID : Found in the "Account Details" section of your WABA.
-
Permanent Access Token :
-
In Business Settings, go to
"Users" > "System Users". -
Add a new system user with admin access.
-
Assign your app and the following permissions:
whatsapp_business_messaging,business_management,whatsapp_business_management -
Generate a new token and copy it for use in your application.
-
-
-
Set Up Webhooks
-
Callback URL for Webhook :
In your app settings, configure the webhook by providing the callback URL where WhatsApp will send event notifications.
You will find this callback url in this page itself that is generated automatically with the title "Callback Url For Webhook"
Note: Please do not tamper this url, if done you won't be able to setup the application. -
WhatsApp Webhook Verify Token :
A default verification token is provided in the application, which should be used when configuring the Webhooks. It's important that the token in the application matches the one you enter during configuration. This ensures the proper verification of the connection between the Meta API and our application.
-
-
Configure Graph API Version : Use the v21.0 version of the Graph API to ensure compatibility and access to the newest features.
-
Enable WhatsApp Integration in LiveChat
-
In your LiveChat Admin Panel, navigate to
"App Settings" > "Integrations" -
Locate the WhatsApp integration section and enter the following details:
WhatsApp Phone Number Used for Registration
Graph API Version
Permanent Access Token
WhatsApp Phone Number ID
WhatsApp Business Account ID
WhatsApp Webhook Verify Token
Callback URL for Webhook
Save the settings to apply the changes.
-
-
-
By completing these steps, you will successfully integrate WhatsApp into your LiveChat platform, allowing customers to initiate chats via WhatsApp, with all interactions managed seamlessly in one place.
Please remember to reply and close the chat within 24 hours from the time the message was sent via WhatsApp. After 24 hours, you will not be able to respond unless the customer replies again. WhatsApp Business API allows replies within 24 hours from the customer's last message. Make sure to respond promptly to ensure efficient communication and customer satisfaction.

-
Instagram Messaging Integration
-
To set up Instagram Messaging Integration, follow the detailed process below. This includes creating a Facebook app, setting up webhooks, creating a Facebook page, obtaining tokens, adding test users, and submitting the app for review to get the required permissions.
-
-
Create a Facebook App
-
Go to Facebook Developers Console : Visit Facebook Developers and log in with your Facebook account.
-
Create a New App :
-
Click "Get Started" > "Create App".
-
Choose "Business" as the app type and click "Next".
-
Enter your App Name, Contact Email, and choose your Business Account.
-
-
Set Up Instagram Messaging :
-
In the app dashboard, go to "Add a Product" and select "Instagram Graph API".
-
Follow the instructions to set up the product.
-
-
-
Set Up Webhooks
-
Add the Webhooks Product : Go to the "Add a Product" section in your app and select "Webhooks".
-
Configure Webhooks : Provide the following details in the Webhooks setup:
Callback URL: Use the value provided in your application.
Verify Token: Use the token provided in your application. -
Subscribe to Instagram Webhooks : Under Instagram Graph API, configure the webhook to subscribe to the following fields:
messages,messaging_seen -
Verify the Webhook : Facebook will send a verification request to your callback URL with the verify token. Ensure your server responds appropriately to complete the verification process.
-
-
Create a Facebook Page
-
Go to Facebook : Log in to your Facebook account and navigate to Create a Page.
-
Create a New Page :
-
Select a category
-
Fill in the required details such as Page Name, Category, and Description.
-
Click "Create Page".
-
-
-
Obtain Tokens
-
Instagram Permanent Access Token
-
Link Instagram to Facebook Page : Go to your Facebook page settings and link an Instagram Business or Creator account.
-
Generate a Token : In the app dashboard, under Instagram Graph API, use the Token Generation Tool to create a permanent access token.
-
-
Facebook Page Access Token
-
Go to Your App Settings : In the App Roles section, assign yourself a role.
-
Add the Messenger Product to your App : Add the instagram call back url and the verify token from the application
subscribe to the following webhook fields
messages,message_deliveries,message_reads
-
-
-
Add Test Users
-
Go to Roles in the App Dashboard : Under "App Roles", click "Roles" and add an instagram user
-
Assign Permissions : Provide Roles with the necessary permissions for the app.
-
-
Submit the App for Review
-
Navigate to App Review : In the app dashboard, go to "App Review" > "Permissions and Features".
-
Request Permissions : Select the permissions required for Instagram Messaging, such as
instagram_manage_messages,pages_messaging -
Submit Screencast and Details :
-
Provide a detailed description of how your app uses these permissions.
-
Submit a screencast showing the app in use, demonstrating how it interacts with Instagram messages. And how deleted mesages are handled.
-
-
Complete App Review : Submit the application for review. Facebook will notify you of approval or any required changes.
-
-
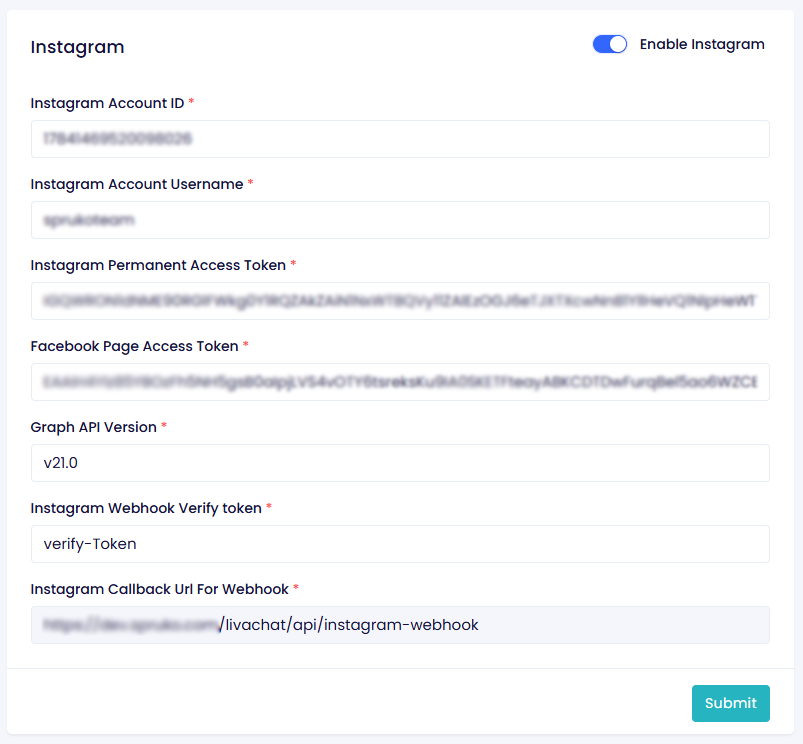
Fill the Integration Details
Use the following fields to set up Instagram Messaging :
-
Instagram Account ID * : Found in the Instagram Graph API setup.
-
Instagram Account Username * : The username of the connected Instagram Business/Creator account.
-
Instagram Permanent Access Token * : Generated during the token creation process.
-
Facebook Page Access Token * : Obtained from
"Messenger" -> "Messenger API Settings" -
Graph API Version * : Use the version already mentioned in the application.
-
Instagram Webhook Verify Token * : Use the token provided in the application.
-
Instagram Callback URL for Webhook * : Use the URL provided in the application.
-
-
-
Once these details are filled in and configured, save the settings to enable Instagram Messaging integration. This will allow you to handle Instagram customer chats seamlessly within the platform.
-
Note : For you receive the webhooks from instagram the App Mode must be set to Live
- In LiveChat, the "Live Chat Ratings" page provides a comprehensive overview of feedback for each operator. This page displays the average rating for every employee, offering insights into their overall performance. Additionally, users can review individual ratings given by customers, allowing for a detailed evaluation of each operator's interactions and service quality.